 Any
line can be marked as a heading
Any
line can be marked as a heading.
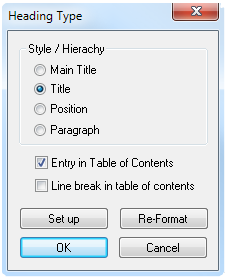
Six different heading
types exist. In
addition to designing the heading type, it is also possible to select
whether it will be entered in the table of contents. At the same time,
the navigator uses this information to display the document structure.
As an option the user can define, whether a page break is to be included in the table of contents. This option allows for the designing and structuring of comprehensive indicees, which require more than one page.
Automatic Numbering: VCmaster allows consecutive numbering while entering headers. A header starting with “#” triggers
the automatic numbering function. Using
Format – Headers – Renumber
consecutively the complete document is checked.
Exception Chapter:
The chapters are not numbered automatically. This enables freely defined prefixed designations that can be placed in headers or footers.
Exception Position: The position number or designation placed
behind "Pos:" or "Position:" can be specified in the header for
printing. To do this, the line must be defined as a position and the
corresponding field placed in the header (for more details, see
Chapter
4.1).
This is position "202" in the example below.
Example:
POS: 202 Console
The key combinations Alt+↑
and Alt+↓ enable the user to jump to the next or previous
heading.
HOTKEY: |
CTRL+H |
MENU: |
Format-Line as heading |
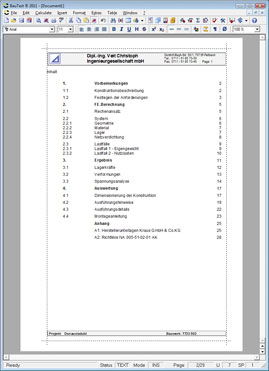
VCmaster
offers the options of either generating the Table of Contents as a text
or created fully automated using the field function(recommended).
In this case the index's
position is defined by a field. While printing or previewing the Table of
Contents is generated automatically at this position. (
Insert –
Fields – Table of Content). The Table of Contents is generated
exclusively as a text, all modifications have to be updated manually or
the index has to be generated again.
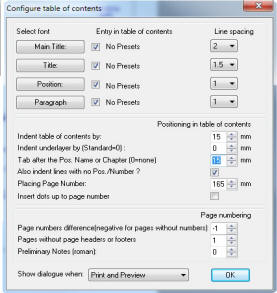
A dialog appears
while generating a Table of Contents, while printing or
previewing. This window offers the option of switching off header
levels (e.g. paragraphs).
Fonts, positioning of page numbers and
spacing are configured under
Extras – Settings – Configure Table of Contents.
Note: VCmaster generates the table of contents
while printing or previewing. For Quick view the current document
is displayed without updated fields.
MENU: |
Insert-Fields-Table of
Contents |
Switching
off page numbering on the cover sheet and the preliminary remarks with
Roman Numerals is done by using the automated Table of Contents.
The dialog is shown while previewing or printing the page, if a Table of Contents is available in the text.
The following order is assumed:
- Pages without numbers, optionally with or without header
- Preliminary remarks with Roman numerals (I-XX)
- Regular pages beginning with page number 1
Note: "0" can be specified.
Note: A cover sheet may also be a specifically designed background image.
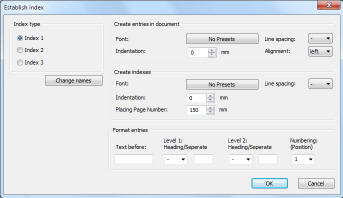
VCmaster
offers the possibility of creating three additional indices aside from the
table of contents. For e.g. the image and attachment indices.
The
names for the indices can be assigned under index types in
Format-Directories-Settings. On the right hand side of the
window entries related to the design of the document are configured. An
entry may consist of a text, the number of related heading levels and a
consecutive number. A separator and the number of digits in a number may
be chosen without restrictions.
Note: Blank
lines may be used as separators. Numbers in headers can only be
taken into account, if the headers are numbered.
Defining an
directory entry: In order to assign certain lines to the Table
of Contents, the cursor must be placed on the respective line. The
status line will display the allocation as IX1, IX2 or IX3.
Placement of the Table of Contents: The table of contents
will be placed in the document using the
Insert -Fields- Fields with
updating function.
MENU: |
Format-Enter index in
line |
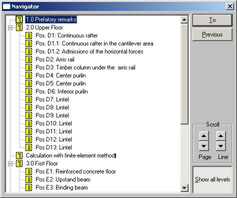
The
navigator allows control of the display utilizing the
document structure (see figure). Headings and positions must be
categorized accordingly (see
Chapter 4.3.1). The
Back view window uses
the same information.
The
navigator can be
started in parallel with the program. In this case, the current chapter is
displayed when working in VCmaster.
The navigator displays inserted section changes with the associated indices. This simplifies the checking of entered modifications and amendments.
Deleting and copying chapters
A context menu is assigned to the headings (click right mouse key). The complete chapter can be edited here.
Unlike deleting, the heading remains intact when cleared and the line is simply
left blank.
With modifications, a new transfer can be added quickly at this location. This is particularly useful when using the
t2W interface.
BUTTON: |
 |
HOTKEY: |
F6 |
MENÜ: |
Extras - Navigator |
 Partially
Hiding Chapters
Partially
Hiding ChaptersWhile working with large documents
keeping track of all the changes made can be a tough task. The user
is now able to
temporarily hide unused or finished
chapters. When required these chapters can be displayed at the click
of a mouse.
This new feature reduces time-intensive
scrolling and skimming to an absolute minimum. Additional
outsourcing of parts of the document, which has been practiced to
maintain clarity, is unnecessary. From now on creating a document in
a consistent layout is even simpler than before, even more so if
utilizing
VCmaster
Hybrid-Technology.
This feature is controlled with
the symbols (

)
and (

).
These appear in front of the corresponding headlines.
By
double-clicking the mouse the respective chapters are hidden or
shown. The selected area ends at the nearest headline of the same
hierarchy.
4.3.6 Cross Referencing
References which specify a page number are a regular component in documentation. As page numbers constantly change during editing, manually
updating references is time consuming and prone to error. VCmaster provides the possibility of setting bookmarks and referring to these
from another position.
To do so, the position to be referenced must first be defined, by inserting a bookmark at
the current cursor position.
It can be referenced to a directory (for example an image directory) and the number of the entry can be taken over in the cross-reference (see
Example 2 and
chapter 4.3.4).
MENÜ: |
Insert-Reference-Insert Cross Reference |
A hidden character is inserted at the cursor position which can be made visible using
CTRL+M or
Extras-Display-Show control marks. Bookmarks are identified by letters marked in color. If the cursor hovers over a bookmark, the stored information is displayed in a small window.
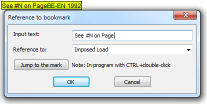
The reference is inserted at the location where you want the page number, on which the bookmark is located, to appear. Entering the identifier
#N in the
input text causes the corresponding chapter or directory number to be the output.
 Example
: A bookmark is inserted as a reference. While printing the page number of the page where the bookmark
Pos102 is located is displayed.
| In Edit Mode: |
|
In Page Preview / While Printing: |
|
|
 |
 |
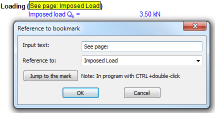
Example 1: The Textmarker named
Imposed Load is located on page 112.
The cross reference (displayed on the left) has been inserted on an arbitrary page. When printing, the page number on which the marker is located, is displayed instead of the cross reference
(displayed on the right).
|
|
|
|
 |
Example 2:
The text marker named BS-EN 1992 is located on page 36 und references to an index entry with the image number 4.2. When printing this number and the page number of
the cross reference are displayed. Place holder #N defines the number of the index entry (in this case, the one of the image).
|